
The Tutorial gives a detailed description of how to score a game using the It's A Hit! Palm Application. This portion of the manual is a reference to give you further information about It's A Hit! and is organized according to Views and Menus.
The GameList View

| 1. | GameList
You can navigate to a particular game by tapping on the name of the Game in the GameList. |
| 2. | New Button
The New Button in the GameList View creates a new game and brings up an empty Game View to be filled in. |
| 3. | Scroll Bar
Once you have filled the screen with games, a scroll bar will appear at the right that enables you to scroll through a couple of screens worth of games. Note that we do not recommend filling your Palm device with games. The It's A Hit! Conduit makes it easy to move games to and from your Palm device so we recommend only having a few games on the device at any given time. |
| 4. | Hardware Buttons
The up and down hardware buttons move you up and down a screen full of games at a time. |
GameList Menu

| 1. | About It's A Hit!
When you select the About It's A Hit! Menu Item you are presented with
the following dialog:
This gives you information about the version number of It's A Hit! that you are running and also gives you the current status of the Lineups! database: not detected, expired, not registered or registered. If you are running a Palm Only release of It's A Hit, the dialog will specify the "Demo" version. The Demo version of It's A Hit! removes games completely from its database when you choose to delete a game. The Pro version of It's A Hit! gives you the option to back up delete games to the archive file on your Desktop Computer. The Demo version also backs up your It's A Hit! database to your Palm Backup directory using the default Hot Sync logic. The Pro Version uses the conduit and gives you the ability to manipulate games between .gms files. |
| 2. | Help
Selecting the Help Menu Item brings up a dialog with a brief explanation of how to use the user interface controls in the GameList View. |
Game View

| 1. | Description Field
This field holds the name of the game and is displayed in the GameList View. You'll want to choose a name that is as brief as possible yet still will be easy to differentiate from others. Long names will be truncated in the It's A Hit! Desktop software if they do not fit. It's A Hit! will not store more than 31 characters in this name. |
| 2. | Date Field
Tapping on the Date Field brings up the standard Palm date dialog for easy date entry. |
| 3. | Visitor Field
Fill in the Visitor Field with the name of the visiting team. If you are using Lineups! you'll want to tap on the popup control next to the field to enable you to fill this field in by pop menu selection. The same tradeoffs apply as described for the Description Field above. |
| 4. | Home Field
Fill in the Home Field with the name of the home team. If you are using Lineups! you'll want to tap on the popup control next to the field to enable you to fill this field in by pop menu selection. The same tradeoffs apply as described for the Description Field above. |
| 5. | Box Score
This is a standard baseball box score with runs per inning and totals for Runs, Hits and Error for each team. If the game goes into extra innings small scroll arrows will appear next to the leftmost and rightmost inning numbers enabling you to scroll through the runs in an extra inning game. If a team scores more than 9 runs in any given inning, It's A Hit! will display an asterisk for the runs in that inning. |
| 6. | Box Score Scrollers
If the game goes into extra innings tap on the left scroller to scroll later into the game and on the right scroller to go earlier. |
| 7. | Done Button
Tapping on the Done button returns you to the GameList View. |
| 8. | Delete Button
Tapping on the Delete Button deletes the game. If you are running the Pro version of It's A Hit! you have the choice of backing the deleted game up to your Archive file: 
If you are running the Demo version of It's AHit! games are deleted
immediately when you tap OK to the following dialog:
|
| 9. | Visitor Button
The Visitor Button navigates to the visiting team's Lineup View if this is the first time it has been tapped in this game otherwise it navigates to the visiting team's Runs View. |
| 10. | Home Button
The Home Button navigates to the home team's Lineup View if this is the first time it has been tapped in this game otherwise it navigates to the home team's Runs View. |
Game View Command Menu

| 1. | Enter Win/Loss/Save
Tapping on the Enter Win/Loss/Save Menu item enables you to enter the pitchers of record for the game. Note that spelling needs to be correct in order for the Stats package to correctly roll up these pitching statistics. |
| 2. | Help
Tapping on the Help Menu Item brings up a dialog with brief information on the user interface controls in the Game View. |
Lineup View

| 1. | Player Name
You can manually enter a player's name by tapping on the field and entering their name. |
| 2. | Jersey Number Fields
You can manually enter a player's number by tapping on the field and entering their number. |
| 3. | Position Number Fields
You can manually enter a player's position by tapping on the field and entering the position. It's A Hit! expects numeric version of positions. Generally accepted conventions are: 1 - Pitcher, 2 - Catcher, 3 - 1st base, 4 - 2nd base, 5 - 3rd base, 6 - shortstop, 7 - left field, 8 - center field, 9 - right field. Some leagues have an extra outfielder (or potentially an extra infielder as well). With an extra outfielder you might for example adopt this convention: 7 - left field, 8 - left center, 9 - right center, 10 - right field. You can use your own convention as long as you stick with it. It's A Hit! Stats does not make any assumptions about numbers being associated with particular positions. The position field also accepts the characters 'dh', 'dp' and 'ep' as designated hitter, designated player and extra player respectively. The latter two are used in some softball leagues. See the section on softball substitutions for more information. |
| 4. | Lineup/Runs/Hits/RBIs Pop Menu
Tap on this pop menu to switch between the different views. |
| 5. | Player Pop Menu Controls
If a Lineups! database is installed and the team name matches a name in the Lineups! database then the pop menu controls will be available for each player position. Simply tap on the control and then select the desired player. The players number, name and position will be filled in. Note that when you make a selection using these controls they replace the existing player, they do not make a substitution for them. |
| 6. | Done Button
Tap the Done Button to return to the Game View. |
| 7. | Sub Button
Tap on a player name, number, position or lineup number then tap on the Sub Button to make a player substitution. |
| 8. | Chg Pos Button
Tap on the Chg Pos Button to make a substitution of a player position without changing their position in the batting order. Such substitutions are common in youth leagues. It's A Hit! keeps track of the current inning and out for the game. When you tap on the Chg Pos button a dialog is displayed that has three fields, the positon, inning and out. Generally, you will simply change the position number and tap OK to make the position substitution. When you do this It's A Hit! will substitute the player for himself with a new position. If for some reason the inning and out are not correct, you can change them in the dialog and this will change their global setting. This way if you are changing the entire lineup, you will only need to enter the inning and out once. |
| 9. | Substitution Pop Menu Controls
After you have made a substitution (or perhaps several) for a player in a given lineup position, you can see the substitutions by tapping on the lineup number. When you do, a pop menu will appear with each of the player names that has been substituted for. By then tapping on a player name in the menu, you can see the details of that particular substitution and edit it if you desire. |
| 10. | Scroll Arrows
If you have chosen to have more than 9 slots in the lineup, vertical scroll arrows appear that enable you to scroll amongst the lineup entries to access them. |
| 11. | Hardware Buttons
The up and down hardware buttons move you to the top and bottom of the lineup when you have more than 9 entries in the lineup. |
Lineup View Command Menu
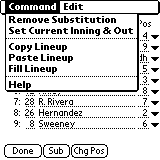
| 1. | Remove Substitution
Tap on the Remove Substitution Menu Item to remove that last substitution at the currently selected lineup position. Select a lineup position by tapping on the name, player number, position, or lineup numbers. |
| 2. | Set Current Inning & Out
It's A Hit! keeps track of the current inning and out while you score a game. Each time you enter an out in the AtBat View the out number is incremented. When the home team gets its third out in an inning the inning number is incremented. If for some reason you need to set the current inning and out to a different pair, tap on the Set Current Inning & Out Menu Item then fill in them in. |
| 3. | Copy Lineup
The Copy Lineup Menu Item give you the ability to copy a lineup that you have already entered. When you are in the Lineup View, simply tap on this menu item then navigate to the Lineup View that you want to fill in and tap on Paste Lineup. Generally speaking, you will use this feature when a team that you are following is playing a new game and your already have a lineup for them in a previous game. |
| 4. | Paste Lineup
See the description for Copy Lineup directly above. |
| 5. | Fill Lineup
Tap on the Fill Lineup Menu Item to completely fill the lineup from the Lineups! database for the team. Fill Lineup fills the lineup with the first n entries in the Lineups! database for the current team where n is either the number of players in the Lineups! database for that team or the number of lineups slots for the team in this game, whichever is less. |
| 6. | Help
Tapping on the Help Menu Item brings up a dialog with brief information on the user interface controls in the Lineup View. |
Runs/Hits/RBIs View
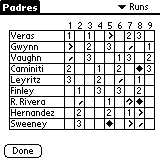
| 1. | Lineup/Runs/Hits/RBIs Pop Menu
This pop menu control switches you between the four different views. |
| 2. | Done Button
The Done Button returns you to the Game View. |
| 3. | Player-Inning Matrix
Tapping on an player-inning position in the Runs, Hits or RBIs view navigates you to the AtBat View for that player-inning. |
| 4. | Up/Down/Left/Right Scroll Arrows
If you have more than 9 lineup entries or more than 9 columns in your scoresheet, the scroll arrows appear and tapping them enables you to access the entire scoresheet. |
| 5. | Hardware Buttons
The up and down hardware buttons cause the scoresheet to scroll all the way to the top or bottom. The Phone and TTD buttons act as left and right buttons and cause the scoresheet to scroll all the way left or right. |
Runs/Hits/RBIs View Command Menu
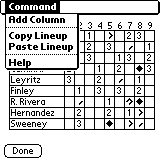
| 1. | Add Column
Tap on the Add Column Menu item to add another column to the scoresheet. This is how you score using It's A Hit! when a team bats around in an inning or when a game goes into extra innings. When you tap on this item a dialog is displayed asking you for the inning number. If you try to add an inning that is beyond the end of the game, this dialog will reject the entry and will ask again. (For example if you currently have columns for 9 innings and specify inning 11 without first adding a column for inning 10, the dialog will reject inning 11 as invalid). |
| 2. | Copy Lineup
See the description for the Copy Lineup Menu Item above. |
| 3. | Paste Lineup
See the description for the Paste Lineup Menu Item above. |
| 4. | Help
Tapping on the Help Menu Item brings up a dialog with brief information on the user interface controls in the Runs/Hits/RBIs View. |
AtBat View
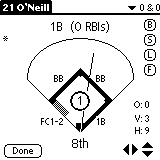
| 1. | Pitch Buttons
Tap on the Pitch buttons to enter pitches. B - ball, S- swing, L - strike looking, F - foul. Pitches appear in columns on the left side of the AtBat View as they are entered. Tapping the up and down arrow wrap around. |
||||||||||||||||||||||||||||||||||||||||
| 2. | Scroll Arrows
Tap on the scroll arrows to navigate around on the scoresheet. Tapping the up and down arrow wrap around. |
||||||||||||||||||||||||||||||||||||||||
| 3. | Hit Location Dragger
The change the location of a hit touch the screen at the end of the line and drag it to a new location. |
||||||||||||||||||||||||||||||||||||||||
| 4. | Hardware Buttons
The up and down hardware buttons move you to the first and last lineup positions while the Phone and TTD (left and right) buttons move you to the first and last innings. |
||||||||||||||||||||||||||||||||||||||||
| 5. | Pitch Pop Menu
The Pitch Pop Menu is a legacy user interface control and accomplishes the same thing as the Pitch Buttons. |
||||||||||||||||||||||||||||||||||||||||
| 6. | Home Popup Menu
Tap on home plate when you are ready to score the results of an at bat. When you do, a pop menu with the two choices "on" (for "on base") and "out" is displayed:
|
||||||||||||||||||||||||||||||||||||||||
| 7. | 1st, 2nd and 3rd Base
Once a batter has reached base they are now a runner and you tap on the base to bring up a pop menu to advance them or designate that they were an out on the basepaths.
|
AtBat View Command Menu
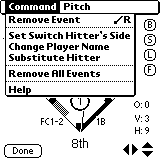
| 1. | Remove Event
The Remove Event Menu Item enables you to "undo" a mistaken scoring entry. Some scoring entries such as hits have more that one event (a hit and a hit location for example). |
| 2. | Set Switch Hitter's Side
The Set Switch Hitter's Side Menu item enables you to designate which side a hitter hits from for each at bat. |
| 3. | Change Player Name
A player's name is stored with each at bat to speed up the drawing of the AtBat View. When scoring a game sometimes you won't have the lineup completely filled before you start scoring. This feature enables you to come back and fix any player names that might be stored incorrectly with the at bat. The typical case where you might need to do this is if you haven't entered any player names in the lineup yet at all and the name appears as Batter #x. When you tap on the Change Player Name Menu Item a dialog is presented that enables you to enter the new player name. You tap OK when you are done and the player name will be updated for the particular at bat. Also note that It's A Hit! stores the player name for the batter of record. This is the name of the player that gets on base or makes an out. If a batter gets on and then is replaced by a pinch runner, the batter's name will still appear as the title for this particular at bat. |
| 4. | Substitute Hitter
The Substitute Hitter Menu Item enables you to quickly make an offensive substitution for the player at the current at bat. When the substitute dialog appears after tapping this menu item the substitution type is filled in with "Pinch Hitter" but you may wish to change this to "Pinch Runner" if the substitution is for a runner and not a batter. |
| 5. | Remove All Events
The Remove All Events Menu Item enables you to remove all the scoring that you have done for the at bat with a single menu selection. |
| 6. | Help
Tapping on the Help Menu Item brings up a dialog with brief information on the user interface controls in the AtBat View. |
AtBat View Pitch Menu
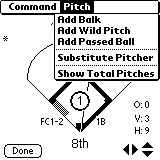
| 1. | Add Balk
Tap on the Add Balk Menu Item to charge the pitcher with a balk. Make sure to do this if you want the balks to be correctly tallied in the Stats program. |
| 2. | Add Wild Pitch
Tap on the Wild Pitch Menu Item to charge the pitcher with a wild pitch. Note that a wild pitch is shown in the pitches column with small "w" but it does not count as a ball in the count and does not get tallied as part of a pitcher's total number of pitches. If you are counting pitches for a pitcher, enter a ball as well. |
| 3. | Add Passed Ball
Tap on the Passed Ball Menu Item to charge the catcher with a passed ball. Note that the is shown in the pitches column with a small "b" but it does not count as a ball in the count and does not get tallied as part of a pitcher's total number of pitches. If you are counting pitches for a pitcher, enter a ball as well. |
| 4. | Substitute Pitcher
Tap on the Substitute Pitcher Menu Item to substitute for the current pitcher that is pitching against this batter. Tapping on this item causes the Substitution Dialog to be displayed with everything filled in except the new pitchers name and number. If It's A Hit! cannot detect who the current opposing pitcher is, it will display a dialog telling you this. If you get this dialog go back and make sure that you have a player with the position of pitcher. |
| 5. | Show Total Pitches
Tap on the Show Total Pitches Menu Item to see the current number of pitches that have been thrown against the team at bat. |
Substitution Dialog Sub Type Pop Menu
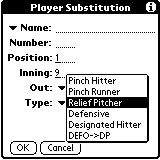
| 1. | Pinch Hitter
Select the Pinch Hitter substitution when there is a substitution for a hitter. |
| 2. | Pinch Runner
Select the Pinch Runner substitution type when there is a substitution for a runner. |
| 3. | Relief Pitcher
Select the Relief Pitcher substitution type when there is a substitution for a pitcher. |
| 4. | Defensive
Select the Defensive substitution type when a player goes into the field for a current defensive player. |
| 5. | Designated Hitter
Choose the Designated Hitter substitution type when you substituting for a player that is only playing defense. This is typically done the beginning of the game. The Chapter 2 of The Tutorial for an example. |
| 6. | DEFO->DP
Choose the DEFO->DP Menu Item when the defense only player becomes the designated player. See Support for Softball Substitutions for more information. |
Copyright © CarryWare
Mobile
Computing, 1999-2000. All rights reserved.